When building games for mobile platforms like Android, managing the size of your game is crucial for both user experience and app store guidelines. Reducing file sizes can lead to quicker downloads, less storage usage, and potentially better performance on lower-end devices. Here's how I customized my Godot Engine build process for size optimization, targeting Android.
Why Custom Template?
Godot's default Android export templates include various modules and libraries that may not be necessary for all games. By compiling custom templates and removing unneeded features, you can significantly reduce the size of your build. This guide walks through the process of building optimized templates for Android
Why this blog post?
While searching for a custom build template for Android, I couldn't find many articles on the topic. The documentation focuses on how to build the template but isn't clear on how to actually use it. I'm not sure if this is the best approach, but I noticed significant improvements with my process. It took me around 20 hours of trial and error to figure it out before, and I couldn't get it to work. Today, I decided to document all the possible steps, work through each one, and see what would work.
Here’s what I tried:
- Using the generated .apks from the custom template option (no luck).
- Replacing the generated .apks and the zip file in the export template location (no luck).
- Removing the entire /android directory and reinstalling it (WOW, this worked!).
So yeah, that's the TL;DR for you.
Let's get started
First and foremost, please check the official documentation. It contains a lot of technical details, but if you've tried custom builds before, you’ve likely gone through it multiple times already. Refer to Compiling for Android and Optimizing a Build for Size.
The above links contain information about setting up the environment for Java, Android, and SCons. Please refer to those documents and complete the setup before proceeding.
First download the Godot source code from Github Release 3.6-stable. Download the Source code (zip/tar.gz) and extract it.
Compiling for Android
I started by compiling Godot for Android targeting both 32-bit (ARMv7) and 64-bit (ARMv8) architectures. These two architectures cover a wide range of Android devices and are sufficient for uploading to the Google Play Store.
- The -j7 flag specifies the use of 7 CPU cores to speed up the compilation process. Adjust this number based on your system.
- Each command generates a .so file in the bin/ directory, but note that I had to run each command twice for successful output. The first run usually took a couple of minutes, but the second run completed in a matter of seconds.
- The first command will generate bin/libgodot.android.opt.armv7.neon.so. (after two run hai)
- The second command will generate bin/libgodot.android.opt.armv8.so. (on second run)
 |
| Logs during the build |
This will generate a default export, we can optimize by disabling 3d or camera and a lot more if we don't need those. For that you can have a custom.py file in the root of the source code. I used this custom.py.
Generating Godot Templates
Next, moved into the Android directory to generate the templates:
It will generate bin/android_debug.apk, bin/android_release.apk, bin/android_source.zip, bin/godot-lib.debug.aar, bin/godot-lib.release.aar.
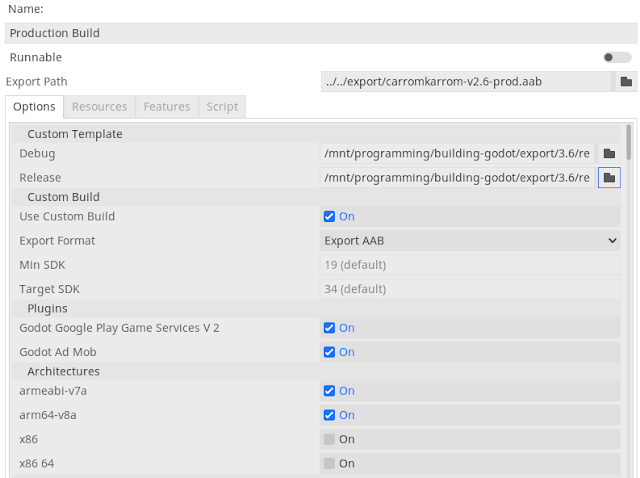
Using Custom Template
As I mentioned earlier using the generated .apk using the Custom Template option did not work.
 |
| Using Custom Template did no work |
 |
| Replacing on template alone did not work |
Using Custom Template - The working way
First, we need to copy the newly generated files to the templates location and replace the default ones. Next, remove the current android/ directory from your project and reinstall it from Project Install Android Build Template... .
This process might seem obvious, or it might be the standard approach outlined in the documentation where you first create a custom build and then install it. Alternatively, I may have missed a more efficient method. However, this approach did result in a slightly optimized app for me.
I have already uploaded the .aab to the Play Store, and the report indicates that the download size has been reduced by 1 MB and the size on the device has been reduced by 4 MB. This version of my app included an additional 0.5 MB of assets, so we can conclude that the optimization effectively reduced the download size by 1.5 MB and the device size by 4.5 MB.
Was It Worth It?
A reduction of just 1.5 MB in size after all this effort might not seem very significant. However, every MB counts, especially for mobile apps. For projects where tight control over APK size is crucial, this approach can still be valuable.
Additionally, this process is a one-time setup for a project. Once the custom build is created, it can be used for many builds, which can make the effort worthwhile in the long run.
What's Next?
In future builds, I plan to experiment with additional optimizations, such as Link-Time Optimization (LTO), which could potentially reduce the APK size by another 1 MB. We can also gain finer control over the modules; I’ve noticed some unused modules in the compilation logs that I could potentially remove to further optimize the build. Stay tuned for updates as I continue to refine this process.


0 Comments